
I have to start this post with a disclaimer to say that this is not really a Campfire Flatbread Pizza recipe but rather a guide for making this delicious treat. The reason for that is – it is ridiculously easy to make and there are countless iterations possible.
The most work involved is thinking about what combination of ingredients you want to put on your Campfire Flatbread Pizza and prepping them. The rest is just assembly and having the patience to wait for it to be ready!

Here’s a breakdown of the basic ingredients.
- Flatbread:
We like to use naan bread but other options include pita, Lavash, and foccacia bread. If you feel like experimenting, try premade pizza dough – just be sure to cook the dough first, and then add your toppings. - Sauce:
The basic version would be with a marinara sauce but if you want to get fancy, go for pesto or even a cream based sauce. For a sauceless alternative drizzle the bread with a nice olive oil and a sprinkle of salt and pepper. - Cheese:
You can’t really go wrong here – mozzarella alone is great, or add a stronger cheese like parmesan, sharp cheddar, goat cheese or blue cheese. - Fresh Toppings:
Here’s where you open Pandora’s box. No brainer options include sliced tomato, sweet onion, mushroom and bell pepper. Kale, artichoke hearts or even pineapple (not necessarily together) will take your Campfire Flatbread Pizza to another level. - Meat Toppings:
Whether you choose good ol’ pepperoni, prosciutto, sliced chicken or crumbled sausage, look for options that are precooked and that will add a nice salty contrast to your fresh vegetable toppings. - Garnish:
Fresh herbs, roasted garlic, olives, chili flakes are some of our favorite options.

Bring everything to camp pre-sliced or make a group activity of it. The trick is to start by prepping your campfire so that by the time you are ready to cook your Campfire Flatbread Pizzas, you’ve got a good bed of coals and low to medium sized flames under the grill.


Campfire Flatbread Pizza
Yield
1 pizza/servingPrep Time / Cook Time
/Activity Guide
Backpacking, Car CampingIngredients
- 1 flat bread
- 3-4 tablespoons sauce
- 1/3 cup cheese, grated
- About 1/3 cup of your favorites veggies, chopped
- 3-4 slices of meat, optional
- Fresh herbs and/or olives, optional
Tools
- Cutting board
- Knife
- Spoon
Method
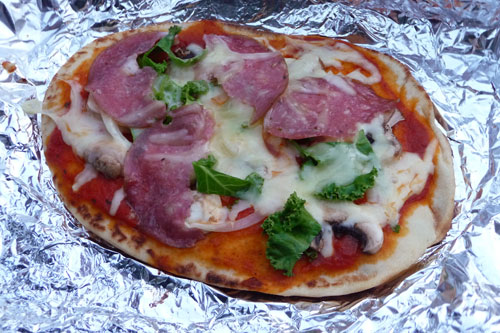
- Pull out a sheet of foil that is at least twice as long as the length of your flatbread and place your flatbread in the middle.
- Layer your ingredients on top of the flatbread starting with sauce, then cheese and toppings.
- Wrap the Campfire Flatbread Pizzas in a sealed foil packet leaving room on top of the pizza so that the foil doesn’t rest on the toppings. Place on grill until the cheese is nice and melted. Open the packet periodically to make sure bottom of flatbread is not burning.

Nice job!
I’ve adapted a version that is backcountry-ready. Depending on gear, I have an 8″ pan that fits mini Boboli crusts perfectly, the sauce packets they also make travel well too. I carry a grater and a block of mozzarella (which will last longer than shredded). Toppings are up to your imagination on what travels well – dehydrated, fresh, smoked, etc. I’ve also used tortillas to make pizza quesadillas/wraps. To add spice, I bring a mix of oregano, garlic powder and red chili flakes. Carry aluminum foil sheets to help melt the cheese.
*Be sure to use the cheese on the first or second day, depending on time of year/temps. I’m still experimenting with cheese varieties that may keep longer without refrigeration.
what a novel idea! i think i wont even bother waiting till my next trip before trying this in my backyard
Love this idea as I was searching for a great dinner idea for my Girl Scout Brownie Troop Camp Out Night dinner in the backyard! Setting out a mass ingredients bar is going to be great for their creativity too, as Girl Scouts love being hands on and doing there own thing to some degree even in planned activities.
That sounds wonderful, Stephanie! Hope you took some pictures. If you did, share them with us on our Facebook page.
These look amazing. I’ve never thought about doing pizzas in foil before. I’ve done them directly on the grill and in the dutch oven but now I’m definitely going to have to try them in foil. Would it work to do these directly on the coals? or is doing them on the grill above the fire the preffered method?
You could definitely try them in the fire, but I think they would burn pretty easily. Cooking them on the grill allows the toppings to stay where they belong, and the foil holds in the flavor and melts the cheese. Let us know how it goes if you do cook them directly over the coals though!
My daughter loves these (she learned how to make these at Girl Scout camp) and most likely I’ll be introducing this to my Girl Scout troop on our first weekend camping trip this fall.
Freeze the cheese. You can still shredded it off the block. It may get slightly crumbly, but that doesn’t matter if you are shredding it anyways. If you keep it insulated, or are cold weather camping it will keep for a while. Same with string cheese.
wow! thank you so much for opening my eyes to this beauty of a recipe! I will never go back to regular pizza cooking as my life is forever now changed. god bless all your Girl Scouts for never breaking the blessed cycle of fire cooked pizza. pizza is now my favoirte meal, but only when fire cooked.
thank you so much, once again…….. thank u.
RAWR XD
We have done pizza pockets for Scouting events, in coals/fire several times. Same basic principal but you put all your ingredients on half of your dough and fold it over and seal the edges. Wrap it in foil and cook on coals or next to the fire for about 20 minutes turning a few times to prevent burning. Careful, they are hotter inside than out. For a non- cook option we made dehydrated salsa leathers for sauce, thinly sliced blocks of mozzarella for the cheese and used Ritz crackers for the dough. Easy and quick for a trail lunch with no clean-up except the knife.