
The night I first made Skillet Enchiladas was on our Carrizo Plains trip at Easter. We were surprised Saturday night by a strong cold wind that wouldn’t let up. It was one of those nights camping where you’d just rather snuggle in your sleeping bag than cook, but we forced ourselves to throw some things together. Its always worth it in the end, and that held true this time as well. We all made our own dinners, of course, competing for the kitchen and the fire. Skillet Enchiladas ended up being the easiest thing I could have chosen. All my ingredients were prepped ahead of time, except the roasted Anaheim chile. That just gave me an excuse to stand by the fire while roasting it, so that was fine. Then I put some canned enchilada sauce in the bottom of a skillet, rolled some tortillas around a handful of ingredients, and put the lid on. They were such a warming and easy camping recipe that I made two skillets worth that night. That’s my favorite kind of gourmet outdoor cooking!
I never revisited my Dirty Skillet Lasagna. I know that makes me a wimp, but maybe just calling myself a wimp will motivate me to go out and try again soon. Until then, though, I’m stickin’ to what works, and making car camping Skillet Enchiladas! Another great recipe for a nonstick skillet and a simmer control stove, Skillet Enchiladas are satisfying crowd pleasers. They are made with typical enchilada ingredients, but on a stovetop instead of an oven. This may work better as a “dirty version” recipe than the lasagna, although I can’t be sure yet. It doesn’t require nearly as much simmering to cook, so it may not stick as easily to the bottom of the pan. Plus, if it sticks a little, it adds the crispiness that you look for in an enchilada- just upside down. Maybe I’ll try the dirty version of this recipe soon too.
I most recently tried making my own sauce with tomatillos and chipotle peppers, continuing on our chipotle kick (because we all need help using up the rest of that can in our freezers). It is excellent and tangy, if you have the time. The tomatillos do take a little while to break down. I added this to the recipe below, although canned enchilada sauce makes it much easier, and still tastes great.
I made these once with chicken, once with pork, and once vegetarian, and they were all a hit. Most recently I was finally able to find fresh corn, which I roasted along with the Anaheim chile. I think its always worth it to use fresh corn when you can find it. It seems that my addiction to Mexican food is paying off when it comes to testing this recipe. Enjoy!


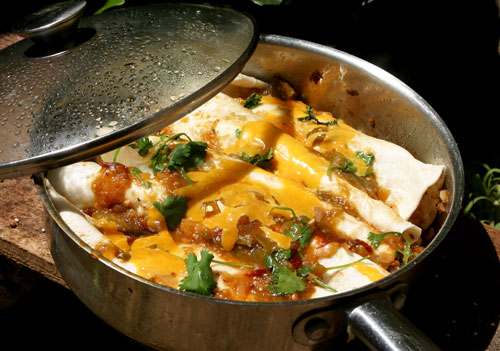
Tomatillo Chipotle Skillet Enchilada
Yield
6 medium enchiladas (2-4 people)Prep Time / Cook Time
/Activity Guide
Bike Touring, Car CampingIngredients
- 1 Anaheim chile
- 5 tablespoons olive oil
- 1 medium onion, chopped
- 1 pound tomatillos, quartered with husks removed
- 1-2 chipotle peppers in adobo, minced
- 3 cloves garlic, minced
- juice from half a lime
- 1/4 cup cilantro, chopped
- 1 12-ounce beer
- 2 chicken breasts, cubed
- 2 ears corn roasted and kernels cut off, or 1 15 ounce can
- 1 15 ounce can black beans
- 1 cup cheddar cheese
- 6 flour tortillas
Tools
- Cutting board
- Grater
- Knife
- Long tongs
- Medium pot
- Mixing spoon
- Large, high-sided skillet with lid
- 2 Bowls
- Plastic wrap
Method
Roast the Anaheim chile
- Char the skin on all sides of the Anaheim chile by holding it over the flame of a camp stove or fire.
- Scrape off skin with a spoon. If too tough, cover the hot chile with plastic wrap for 5 minutes to steam and try again.
For the Sauce
- Turn stove onto medium heat and add two tablespoons of the olive oil and half of the onion to a skillet. Saute until translucent, about 2 minutes.
- Add tomatillos, chipotle peppers, and garlic, and saute until tomatillos start to break down, about 10 minutes.
- Add beer and scrape the bottom of the pan to deglaze.
- Reduce the heat to low and let simmer for about 20 minutes until thickened into a sauce. Add salt and pepper to taste. Transfer to a bowl and set aside.
For the Enchiladas
- Add 2 tablespoons of olive oil to the skillet on medium-high heat. Add the chicken and remaining onions, and saute until chicken is cooked through, about 5 minutes. Set aside.
- Add 1 more tablespoon of olive oil and half the sauce to the pan.
- Fill each tortilla with about 2 tablespoons of each of the following: cheese, chicken, corn, black beans, Anaheim chile. Roll carefully, and place into the skillet, open edge down, so that it won’t unroll.
- Repeat tortilla filling until your skillet is full. Add the rest of the sauce to the top of the tortillas, and then sprinkle remaining cheese. Cover and cook just until the cheese on top is melted and enchiladas are heated through. Serve with sour cream and guacamole.

This is a sweet blog. I’m going subscribe.
Another car camping trip allowed my husband and I to try out another one of your great camping recipes. We had difficulty making the enchiladas because we only had a pot and we needed a skillet. Nevertheless, we mixed all the ingredients together and made camping burritos instead. Thanks a lot for keeping this blog so up to date!
Love you Emily!
I prefer steaming peppers by putting them in paper bag for 5 mins after charring. Easy to drop them in w/o wrasslin’ with plastic wrap.
I had atomato going a bit soft, so I roasted it & chopped up to add with beans, corn ,etc.
Here’s on I’ll share..One pan Tomale Pie. Lg cast iron fry pan w/lid. Hamburger, onions, garlic. fresh corn off cob or canned, chopped cannned tomatoes, black olives, masa herina, and sharp chedder cheese (grated). Chili powder, salt, chili arbole to taste. Brown meat, garlic & onions with spices. Don’t drain tomatoes or corn just add to meat in pan. Cook until well blended then add drained olives, sprinkle masa herina with a bit of chili powder for color over top. Put lid on and cook until all liquid is absorbed. Sprinkle cheese on top replace lid until cheese is melted and it’s ready to eat! I didn’t give mesurments because you can make as much or as little as you want! All thing can be chopped ahead of time and even the meat can be browned ahead….good over a campfire. 🙂
There is limes and cilantro I. The ingredients but no directions on what to do with them? Sauce? Chicken or on top?